

How to Fix Crawl Errors in Google Search Console A Step-by-Step Guide
- Justin Gleo

- Feb 13, 2025
- 8 min read
Fixing crawl errors in Google Search Console can seem daunting. But it's easier than you might think.
Crawl errors occur when Googlebot can't access your pages. These errors can harm your site's SEO. Google Search Console is a powerful tool. It helps webmasters monitor and maintain their site's presence in search results. When crawl errors appear, it means search engines face issues accessing your content.
This can lead to lower rankings and less traffic.
Fixing these errors is crucial for maintaining a healthy website. In this blog post, you'll learn how to identify and resolve common crawl errors in Google Search Console. By following these steps, you can ensure search engines index your site correctly. This will improve your site's visibility and performance. Let's get started!

Accessing Google Search Console
Google Search Console is a powerful tool for website owners. It helps you monitor and fix crawl errors. Accessing Google Search Console is the first step in this process. Let's explore how to set up an account and navigate the dashboard.
Setting Up An Account
First, visit the Google Search Console website. You need a Google account to sign in. If you don't have one, create it. After signing in, click on the "Start Now" button. Enter your website's URL in the provided field. Choose between the domain or URL prefix method. Verification is next. Google needs to confirm you own the site. There are several methods for this:
● HTML file upload
● HTML tag
● Google Analytics
● Google Tag Manager
● Domain name provider
Choose the easiest method for you. Follow the instructions provided. Once verified, you can access your dashboard.
Navigating The Dashboard
The dashboard is user-friendly. On the left side, you will find the main menu. It includes:
● Overview
● Performance
● URL Inspection
● Coverage
● Sitemaps
● Mobile Usability
Click on any menu item to view details. The Overview section gives a quick summary of your site's health. The Performance tab shows data on clicks, impressions, and average position. Use this data to understand how your site performs in search results. To check specific URLs, use the URL Inspection tool. This helps identify problems with individual pages.
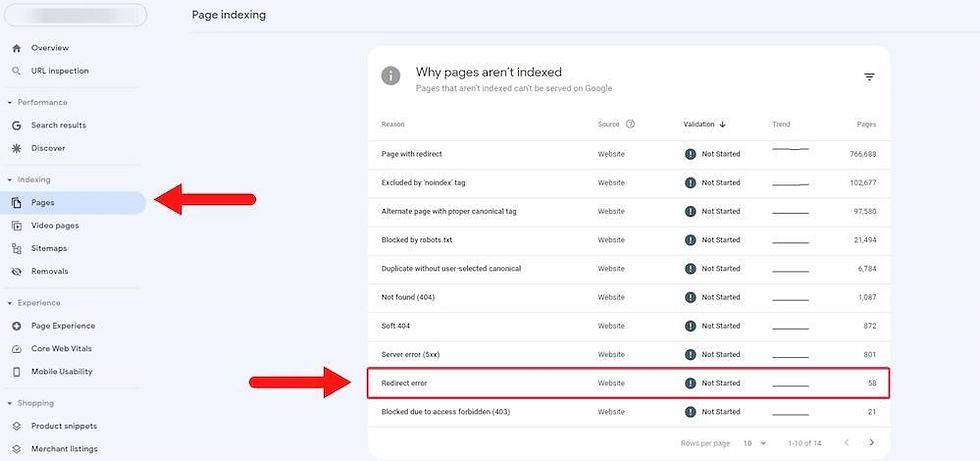
The Coverage section shows any crawl errors. It highlights pages Google could not index. Fix these issues to improve your site's visibility.
In the Sitemaps section, submit your site's XML sitemap. This helps Google find and index your pages faster.
The Mobile Usability tab is crucial. It shows issues affecting mobile users. Fix these to ensure a good user experience on mobile devices. By mastering these sections, you can effectively manage and fix crawl errors.
Identifying Crawl Errors
Understanding crawl errors is key to improving your website's SEO performance. Google Search Console helps you identify these errors. This tool provides detailed reports on crawl issues affecting your site. Identifying these errors helps you fix problems that hinder your site's visibility. Let's dive into the types of crawl errors and how to locate them in Google Search Console.
Types Of Crawl Errors
Crawl errors fall into two main categories: Site errors and URL errors. Site errors indicate issues with your entire site. These include DNS errors, server errors, and robots.txt fetch errors. URL errors are specific to individual pages. They include 404 errors, access denied errors, and soft 404 errors. Knowing the type of error helps you apply the right fix. Each type requires a different approach to resolve.
Locating Errors In The Console
First, log in to your Google Search Console account. Navigate to the "Coverage" report on the left-hand menu. Here, you'll see a summary of crawl errors affecting your site. Click on the error type to see specific details. The console lists the URLs with issues and provides insights on each error. Use this information to prioritize and address the errors.
Regularly monitor the "Coverage" report to catch new errors early. This ensures your site remains crawlable and visible to search engines.

Fixing Url Errors
URL errors in Google Search Console can affect your website's performance. Fixing these errors helps improve your site's visibility in search results. Addressing common URL errors like 404 Not Found and 500 Server Errors is crucial. Let's explore how to fix these issues effectively.
404 Not Found
A 404 Not Found error means the page doesn't exist. This can happen if the URL is incorrect or the page is deleted. To fix this, check the URL for any typos. If the page is removed, create a 301 redirect to a relevant page. This helps users and search engines find the right content.
500 Server Errors
A 500 Server Error indicates a problem with your server. This error is more technical and requires checking the server's logs. Look for any issues related to server configuration or script errors. Fixing these issues often involves your hosting provider or a developer. Regularly monitor your server's performance to prevent these errors.
By addressing these common URL errors, your site will perform better. This will lead to improved search engine rankings and user experience.
Resolving Dns Errors
Google Search Console is essential for any website owner. It helps identify and fix crawl errors. One common issue is DNS errors. DNS errors can prevent search engines from accessing your site. This affects your site's visibility and ranking.
Common Dns Issues
Several DNS issues can affect your website.
Here are the most common ones:
● DNS Timeout: The server takes too long to respond.
● DNS Lookup Failure: The domain name cannot be found.
● Server Not Found: The server is unavailable or down.
Steps To Fix Dns Errors
Follow these steps to fix DNS errors in Google Search Console:
1. Check Your DNS Settings: Ensure your DNS settings are correct. Use tools like What's My DNS to verify.
2. Contact Your Hosting Provider: Sometimes, the problem is with the hosting provider. Contact them for help.
3. Update DNS Records: Make sure your DNS records are up to date. This includes A, CNAME, and MX records.
4. Clear DNS Cache: Clear your local DNS cache. This can resolve temporary issues. Use the command prompt or terminal.
5. Monitor DNS Propagation: DNS changes can take time to propagate. Monitor the changes using propagation tools.
Fixing DNS errors ensures your site is accessible. This helps search engines crawl and index your site properly. Regularly check Google Search Console for any issues.
Addressing Robots.txt Issues
Addressing Robots.txt issues is crucial for fixing crawl errors in Google Search Console. A well-optimized robots.txt file guides search engine bots on which pages to crawl or avoid. Misconfigured rules can block essential pages, affecting your site's indexing and visibility.
Checking Robots.txt File
Start by accessing your robots.txt file. You can usually find it at yourdomain.com/robots.txt. Ensure the file is available and accessible. If you see a 404 error, create a new robots.txt file. Add it to the root directory of your website.
Use Google Search Console to check if Google can access your robots.txt file. Go to the "Robots.txt Tester" tool in the "Legacy tools and reports" section. Enter your file's URL and click "Test" to check for any errors.
Correcting Disallow Directives
Analyze the directives within your robots.txt file. Ensure you are not blocking important pages by mistake. Look for "Disallow" rules and check if they are necessary. For example, "Disallow: /" blocks your entire site. Remove or modify such directives if they are not needed.
Specify which pages or folders should not be crawled. Use precise URLs to avoid blocking essential content. For example, "Disallow: /private/" only blocks the "private" folder. This ensures other parts of your site remain accessible to search engines.
Finally, update and test your robots.txt file after making changes. Use the "Robots.txt Tester" tool in Google Search Console to verify your updates. This ensures Google can crawl and index your site properly.
Handling Sitemap Errors
Handling sitemap errors is crucial for maintaining your site's health. A sitemap guides search engines to your important pages. Errors in your sitemap can hinder this process. Fixing these issues in Google Search Console can boost your site's visibility.
Validating Sitemap
First, check if your sitemap is valid. Visit Google Search Console. Navigate to the "Sitemaps" section. Enter your sitemap URL and click "Submit". Google will process it. Look for any error messages. These messages help identify issues.
Errors might include incorrect URLs or unrecognized tags. Fix these problems in your sitemap file. Use tools like XML Sitemap Validator for help. Re-submit the corrected sitemap in Google Search Console.
Updating Sitemap
Keep your sitemap updated. Add new pages to your sitemap regularly. Remove outdated or deleted pages. This ensures search engines have the latest map of your site.
Automate the updating process if possible. Many Content Management Systems (CMS) offer plugins. These plugins update your sitemap automatically. Check your sitemap periodically. Make sure it remains accurate and error-free.
Monitoring And Maintenance
Monitoring and maintenance are crucial steps in ensuring your website runs smoothly. By keeping an eye on crawl errors, you can fix issues before they affect your site's performance. This process involves regular checks, setting up alerts, and being proactive in maintaining your site’s health.
Regularly Checking For Errors
Regular checks help you catch problems early. Log in to Google Search Console weekly. Look for any new crawl errors.
● Go to the Coverage section.
● Check for Errors and Warnings.
● Note down the URLs with issues.
Once you identify these errors, you can start fixing them. Common errors include 404 Not Found and Server Errors. Fixing these quickly helps maintain your site's health.
Using Alerts And Notifications
Google Search Console offers alerts and notifications. These tools help you stay updated without constant manual checks.
To set up alerts:
1. Go to the Settings in Google Search Console.
2. Click on Email Notifications.
3. Enable Errors and Issues notifications.
These alerts notify you of new crawl errors. You can act fast and keep your site healthy.
Type of Error | Action
|
404 Not Found | Fix broken links or redirect to valid pages. |
Server Errors | Check server logs and resolve issues. |
By monitoring and maintaining your site, you ensure a better experience for users and search engines. This proactive approach improves your site's performance and visibility.
Frequently Asked Questions
What Are Crawl Errors?
Crawl errors occur when Googlebot can't access your web pages. They can negatively impact your site's search visibility.
How To Find Crawl Errors In Google Search Console?
To find crawl errors, log in to Google Search Console. Navigate to the "Coverage" report under the "Index" section.
How To Fix 404 Errors?
Fix 404 errors by redirecting broken URLs to relevant pages. Use 301 redirects for a permanent solution.
Why Are Crawl Errors Important?
Crawl errors are important because they affect your site's indexing. Fixing them ensures better visibility in search results.
Conclusion
Fixing crawl errors is crucial for your website's health. Regularly check Google Search Console. Address issues promptly to maintain site performance. Identify common errors and resolve them quickly. Improve your site’s user experience and search rankings. Stay proactive with monitoring tools.
This keeps your site running smoothly. Clear navigation helps search bots. Consistent updates ensure fewer errors. Better visibility means more traffic. Follow these steps for a problem-free website.
Let’s Build Your Success Together
Don’t wait for results to happen—create them. With URDigital Tech, you’re not just getting a service; you’re gaining a partner invested in your success.
Email us at: solutions@urdigitaltech.com
Text us at: (716) 400-0769
Contact us today to see how we can help you turn ideas into impact and opportunities into achievements.


Comments